Excel tables are an easy and convenient way to create and store data in Excel Worksheets. By organizing and grouping related information into rows and columns, it makes it easier to understand and analyze your data. An Excel table uses structured references in formulas, which makes it easy to create lookup formulas like XLOOKUP by referencing table columns dynamically. This improves formula readability and reduces errors. Excel also provides a library of pre-defined table styles and themes so that you can easily customize the appearance of your data to match its function or your brand theme. Most importantly, tables integrate seamlessly with Excel’s data analysis tools, such as PivotTables and PivotCharts, allowing you to perform data analysis and visualization on your data with ease.
To create your own Excel table, follow these steps.
- Open a blank workbook in Excel and save it as “Procurement File”.
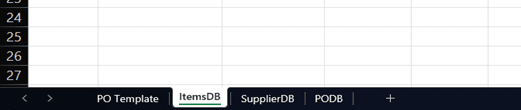
- Rename “Sheet 1” to “PO Template” and add a new worksheet by clicking the + button next to the worksheet name. Rename this new worksheet as “ItemsDB”.
- Add two more worksheets and rename them to “SupplierDB” and “PODB” respectively.
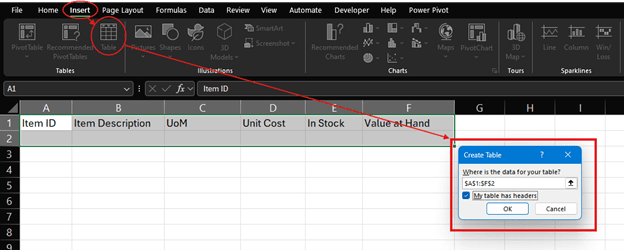
- Select the ItemsDB worksheet and add the following column headers in cells [A1:F1].
- “Item ID”
- “Item Description”
- “UoM”
- “Unit Cost”
- “In Stock”
- “Value at Hand”
- Highlight all your column headers and one row below it [A1:F2]. Click the Insert tab and on the Tables group, click ‘Table’. A pop-up will appear on the screen that asks you if your table has headers. If it is not already checked, check it and click okay.
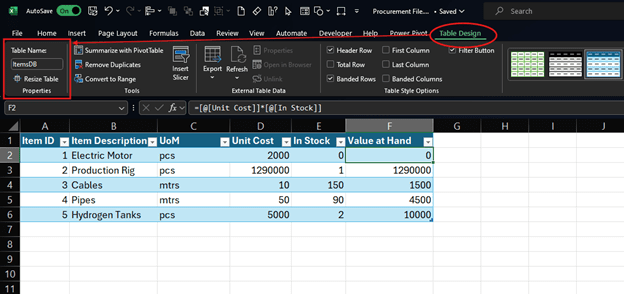
- After inserting the table, Excel automatically opens the ‘Table Design’ tab where you can customize the table. On the left of the Table Design tab, in the Properties Group, change the table name from “Table1” to “ItemsDB”. It is important to give your tables a memorable name so that it becomes easy to reference their columns when using functions.
7. Repeat the same for your SuppliersDB table and PODB tables. Check the images below to see the header names you can use for these tables.
Quick Tip: After you highlight your column heads, you can use the insert table shortcut by pressing CTRL+T on your keyboard.
Watch the video below for a more detailed step-by-step guide on how to create tables.
How To Design a Purchase Order Form
In this section, you will learn how to design a form that is printable and exportable to PDF for filing or e-mailing. There are plenty of PO templates online which you can draw inspiration from. You can copy and paste a design you like onto your worksheet and do some editing to fit your style. As standard, the template you choose should have these sections:
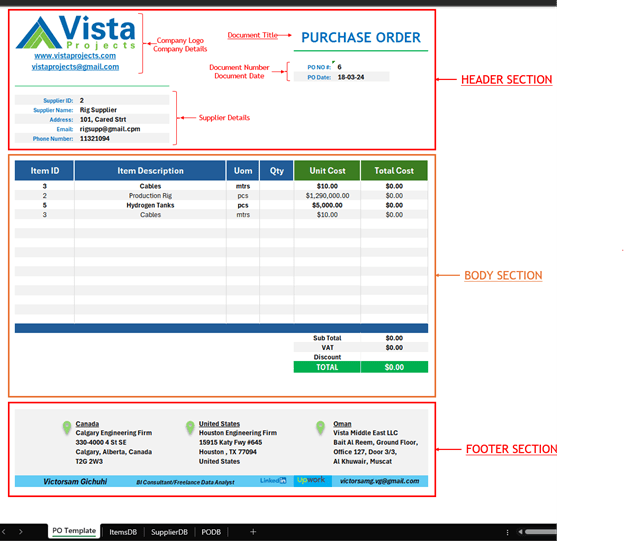
The Document Header
The header section should have these sub-sections.
- A section to insert your company logo and company details.
- A section for the document title.
- A section to indicate the document number and date.
- A section to include your supplier details.
The Document Body
This is where you are going to include all the items you want to purchase in a tabular format with column headers and Column Totals.
The Document Footer
In this section, you can include additional information that you would like to communicate to your suppliers. You can include shipping addresses, some terms and conditions, social media handles, etc. You could also use this section to advertise your brand or company by inserting links to your social media handles and other contact information (get creative).
Watch this video to learn how you can custom-design your own PO Form from scratch.
Next, you are going to learn how you can use a combination of data validation and XLOOKUP to easily insert new entries into the form.
Work With an Industry Leader
Since 1985 we have provided high-quality, fit-for-purpose engineering and system integration services to clients in a myriad of industries around the world.
Looking for project-driven supply chain management software?
Current SCM is the first of its kind – supply chain management software purpose-built to support the most complex procurement and materials management projects. With materials management and vendor document requirements uniquely integrated into the order, Current SCM provides a unified, collaborative platform to streamline the end-to-end process of project-driven procurement and materials management.
If you are engaged in any direct procurement, technical procurement, project procurement or third-party procurement, Current SCM will improve your procurement and materials management workflow. If you are engaged in all four, Current SCM will revolutionize the way you do business.
Contact our sales professionals at Current SCM today!